Click here to see all articles in this series: DIY Wood Steering Wheel
Choosing the Wood
Satisfied with my prototype, I was ready to procure some quality lumber for the real wheel. I'm fortunate to have a Rockler store minutes from home, so I paid a visit to peruse the available cut stock. I was looking for 3 inch wide by 1⁄2 thick lumber for the main front and back halves and I also wanted a 3 inch wide by 1/8 inch thick piece for the accent layer in the center. Anyone who has been to Rockler knows there are myriad choices ranging from the domestic standbys such as walnut, oak, cherry, and so on but there are also numerous exotic hardwoods like bubinga, cocobolo, mahogany, and many more.
Admittedly, I was tempted by the exotics which range in color and texture from brown, to red, to purple, to black, to curly and striated. For a brief time one morning after having a particularly rich and delicious cup of Kona coffee, I was even thinking about Koa wood from Hawaii. In the end, common sense and Yankee thrift prevailed so I decided to keep things basic. I chose cherry for the main part and black walnut for the accent. Cherry is a favorite wood of mine. It machines beautifully, it looks great when it ages to a warm amber/brown/red color, and it's not terribly expensive compared to the exotics.
I selected the black walnut simply as a darker accent layer to be sandwiched between the two cherry halves. Recall my description of construction as making a bagel in two halves, well, the black walnut is like a layer of cream cheese in the completed bagel sandwich and as a complete layer you'll see the accent on the ID and OD.
My material list from Rockler was the following: (QTY), size, species
- (2) 3in x 1/2in x 48in Cherry
- (1) 3in x 1/8in x 48in Black Walnut
- (1) 1-1/2in x 1/8in x 48in Cherry (this last bit was for use as splines in the joints, more shown later)
Total cost including the outrageously high CA state sales tax was just over $50 USD. Now I was truly committed to the project as this was the first outlay of cash. There would be no turning back...
Making the Blanks for the Halves
As noted earlier I planned to construct the circles from hexagons. Based on calculations made during the design phase, I need to cut the lumber into trapezoid shapes (actually, isosceles trapezoids) where the long side was 9.25 inches and the base angle was 60 degrees. To cut the proper base angle, I set my saw to cut at 30 degrees - I must have spent 15 to 30 minutes setting my chop saw but accuracy is a must. I used a 30-60-90 triangle from my old drafting set to set the blade and made a few test cuts on scrap to ensure the angle was correct.
Before I cut any pieces, I first had to complete a preliminary glue-up. After selecting the nicest sides of the lumber to be the outside faces, I glued the 1/8 walnut to one of the 1⁄2 cherry pieces. This made one of the blanks a 5/8 inch lamination and I made this thicker half the front half (driver facing) side of the wheel.
With the laminated lumber fully cured, it was time to cut. As noted, I needed trapezoids 9.25 inches on the long side. Instead of measuring each cut, I clamped a small block to the bed of my compound miter saw so it was just a matter of sliding the board up to the block and making the cut. The blade on my saw has a thickness of about 5/32 and when I was finished cutting the 48 lengths into pieces, I had barely more than one inch of scrap. Needless to say, measure carefully or you'll be heading out to buy more lumber should you make any mistakes! Figure 9 shows my rough sketch and calculations prior to cutting the lumber into the required pieces.
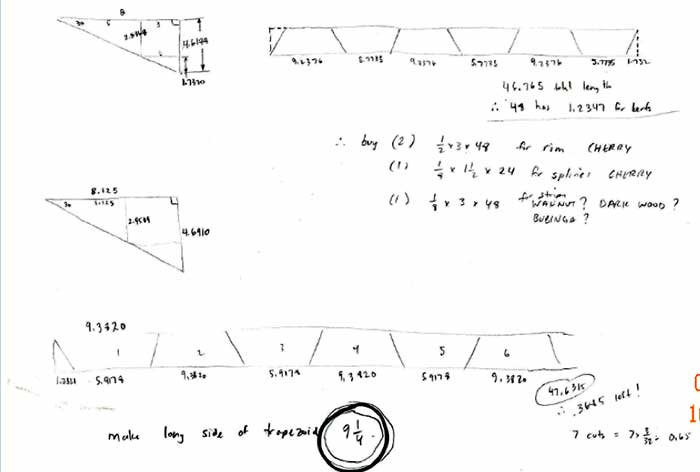
Figure 9: Layout for cutting rough lumber
Once I had all of the segments cut, I took an extra step that I didn't perform with my pine prototype. I decided that I would use a spline in each of the glue joints. A spline is used to enhance the strength of a glue joint by creating additional surface area to which glue is applied. Frankly, modern glues would probably create a sufficiently strong butt joint without needing a spline, but when given a chance I tend to overdo everything. Moreover, I had a slot cutting bit for my router so I figured I might as well use the tools that I have available. My slot cutting bit cuts a slot exactly 1/8 inch wide by 1⁄2 inch deep. When cutting the slots on each end of my trapezoid segments, I mounted the bit to cut the slot in the center of the cherry portion of each piece.
Once you have cut the slot, you'll need to make splines of the appropriate dimension. Since the 1/8 thick cherry stock I purchased was 1-1/2 inches wide, I had to cut the board down to size to make it only 1 inch wide and I did this using a simple block plane.
Figure 10 below shows a slot cut into the end of one of the trapezoid segments. Figure 11 shows the how the spline fits into the slots of two adjoining segments.
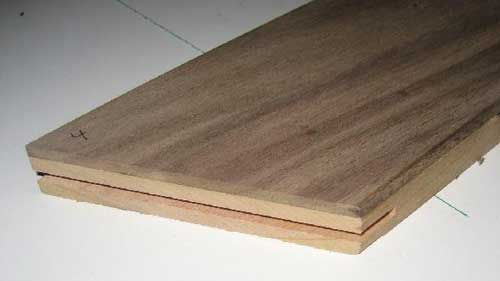
Figure 10: Segment showing slot cut for spline. This piece is one of the laminates of cherry and walnut; the slot is centered in the cherry portion of this segment
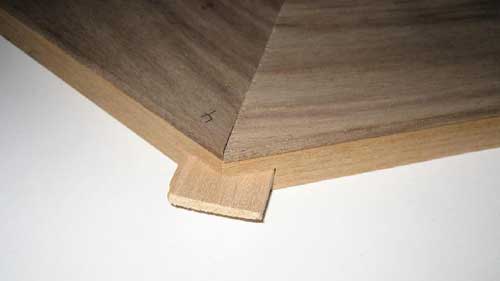
Figure 11: Detail showing the spline joint between two segments. Notice the 1 inch wide spline neatly fits into the 1⁄2 inch deep slots in each segment.
Once all the pieces were cut and the slots were complete, it was time to glue. There are lots of different wood glues and no doubt many are suitable for this application. I chose to use Gorilla Glue which as previously mentioned is a urethane glue. The glue is water proof, it's UV resistant, and it works over a wide range of temperatures. I didn't have a suitable band clamp to glue the hexagonal shapes in one shot, so I did each hexagon in two steps. First, I glued three pieces together to make half a hexagon. I used a flat piece of plywood as a base and I clamped that to the granite countertop of my kitchen peninsula – I wanted to ensure my base was absolutely flat and the granite counter was the flattest surface to which I had access. When using clamps be sure to only apply enough pressure to hold the parts together with minimal squeeze out. I did this first stage of glue up four times to complete four half-hexagons. Once these glue ups were complete it was time to glue pairs of half-hexagons together to make the complete hexagons.
See the following pictures showing examples of the glue-up operation.
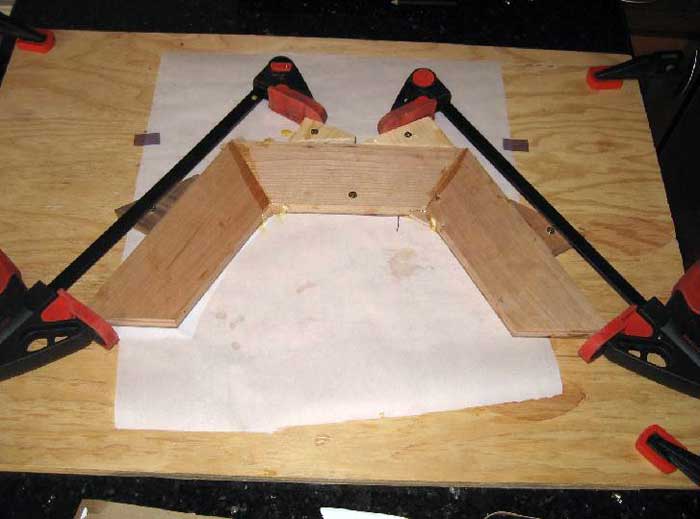
Figure 12: Glue-up of three segments
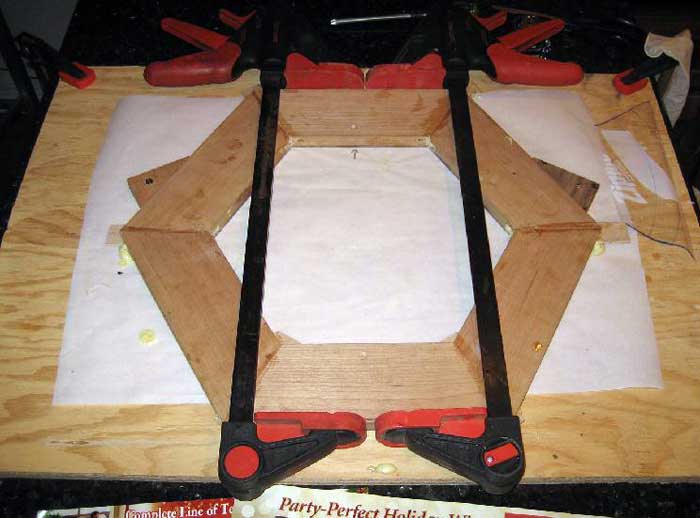
Figure 13: Glue-up of two three-segment subassemblies to make full hexagon blank
Figure 12 shows glue up of half a hexagon. Figure 13 shows glue-up of a complete hexagon. For those wondering, the white paper under the glue-up is parchment paper used in baking. It's a silicone impregnated paper that is extremely non-stick and it ensured my glue-ups didn't stick to the table. It costs but a few dollars per roll and it has plenty of uses around the house and garage. As Martha Stewart has said innumerable times to the annoyance of many, well, at least to the annoyance of me, it's a good thing.
The Gorilla Glue has a two hour cure time so these glue ups were completed over the course of a couple days.


your help, perhaps one day will come and be ready for Spring! Thanks for your detailed and
documented explanation of hoe to get 'er done!
you.
Now to find a steering wheel on Ebay for the progect.
Any project need a plan and a starting point. Reading this article is a great start.
Can you tell me what you did to the metal? It looks so shiny and pretty.. I am trying to restore mine (I have that same one with the foam) I just removed the surface rust, but the metal looks like stained. Any help is appreciated!
morris minor wheel....
morris minor wheel....
project instructions but with a different steering is it possible to
cut and weld peices so that it becomes a quick release because the
steering i have has round edges and the midle (center part)is for stock
cars... need your help thanks
similar, but based on the original sprung/dished profile Minor steering
with a thinner rim. Though this would entail some unique difficulties of
its'own I think. One day. Great article.
me money!
Thank you!
process, use of a prototype, making the few tools you had work, and
general description of how and why you did what you did. Finished
product looks outstanding.
Want to leave a comment or ask the owner a question?
Sign in or register a new account — it's free